Crested Gecko Vivarium Setup: Step-by-Step Guide
This post contains affiliate links. As an Amazon Associate, I earn from qualifying purchases at no extra cost to you.
Setting up a crested gecko vivarium for the first time can feel overwhelming. You are not just filling a box; you are building a small ecosystem your gecko will live in for a decade or more. Get the layers wrong and you risk mold, standing water, and a stressed animal. Get them right and you end up with a thriving planted enclosure that practically maintains itself.
When we set up our first crested gecko vivarium, we spent a week second-guessing every product choice. This guide compresses that research into one actionable walkthrough.
Choosing the Right Vivarium for Your Crested Gecko
Before you touch a single bag of substrate, the enclosure size and style determine everything else.
Size by age
Juveniles under 15 grams do well in a 10-12 gallon (30x30x45 cm) enclosure. An adult crested gecko (35+ grams) needs at minimum an 18x18x24 inch (45x45x60 cm) vertical enclosure. More space is always better. The most common mistake is starting too small and rebuilding six months later.
The rule of thumb: taller is more important than wider. Crested geckos are arboreal and spend the majority of their time off the ground.
Front-opening vs. top-opening
Front-opening glass terrariums are the standard for crested gecko vivariums. They let you access the enclosure without reaching down from above, which can startle a gecko, and the front door makes watering plants and spot cleaning much easier.
Top-opening enclosures can work but are generally harder to plant well and more stressful to service daily.
Glass vs. PVC
Glass holds humidity reasonably well with a screen top and offers excellent visibility. PVC panels hold humidity better and are lighter, but are less visually appealing. For a planted display vivarium, glass is the most popular choice. We have tested both glass and PVC builds and prefer glass for long-term display setups; the visibility and aesthetics are worth the slightly higher humidity management effort.
Vivarium Setup Materials and Tools Checklist
Gather everything before you start. Stopping mid-build to order a missing item means leaving your setup half-assembled for days.
Hardscape and structure:
- Cork bark rounds or flats (background, hides, climbing surfaces)
- Branches or vines (artificial or real; if real, clean and fully dried before use)
- Rocks or slate as desired for ground-level interest
Substrate system:
- Drainage layer material (LECA/hydroballs, or pea gravel)
- Separation layer (fine mesh or weed fabric)
- Bioactive substrate mix
Plants and equipment:
- Live tropical plants suited to high humidity (see our guide to the best live plants for a crested gecko vivarium)
- Misting system or hand sprayer
- LED lighting with plant spectrum
- Digital thermometer/hygrometer
Tools:
- Long tweezers or tongs
- Small gardening trowel
- Mixing tub or bucket
- Spray bottle for dampening substrate before planting
Step-by-Step: Building the Crested Gecko Vivarium
This is the build sequence we use for every vivarium. Follow the order; skipping steps (especially the drainage layer) creates problems that are hard to fix without tearing the whole enclosure apart.
Step 1: Prepare the enclosure
Clean the empty enclosure with a reptile-safe disinfectant. Rinse thoroughly and let it fully dry. Any residual cleaning agent will harm beneficial bacteria and plant roots.
If you are adding a cork bark background, do it now. Silicone the cork panels to the back wall and allow 48-72 hours to cure with the enclosure open before introducing any moisture or the gecko.
Step 2: Add the drainage layer
Pour 1.5 to 2 inches of LECA (lightweight expanded clay aggregate) or pea gravel as the base layer. This creates a reservoir that excess water drains into, preventing the substrate above from becoming waterlogged. Waterlogged substrate is the primary cause of mold, rot, and anaerobic bacteria in bioactive setups.
Aim for a level, even layer across the full floor.
Step 3: Add the separation layer
Place a piece of fine mesh, fiberglass window screen, or weed fabric directly on top of the drainage layer. This keeps substrate from falling into the drainage reservoir while still allowing water to pass freely. Cut it to fit the floor exactly, working around any cork bark that runs to the floor.
Step 4: Mix and add substrate
Josh’s Frogs ABG Mix is a pre-formulated blend of tree fern fiber, long-fiber sphagnum moss, peat, orchid bark, and charcoal. It is the same substrate system originally developed by the Atlanta Botanical Garden for high-humidity vivarium applications and has become the standard in the bioactive vivarium hobby. According to ReptiFiles’ crested gecko care guide, a well-structured substrate layer is one of the most important factors in maintaining a stable bioactive enclosure long-term.
Lightly dampen the mix before adding it; dry substrate is dusty and harder to plant. Add 2-3 inches on top of the separation layer. Press gently to remove large air pockets, but do not compact it. Plants and microfauna need aerated soil to thrive.
Step 5: Add hardscape
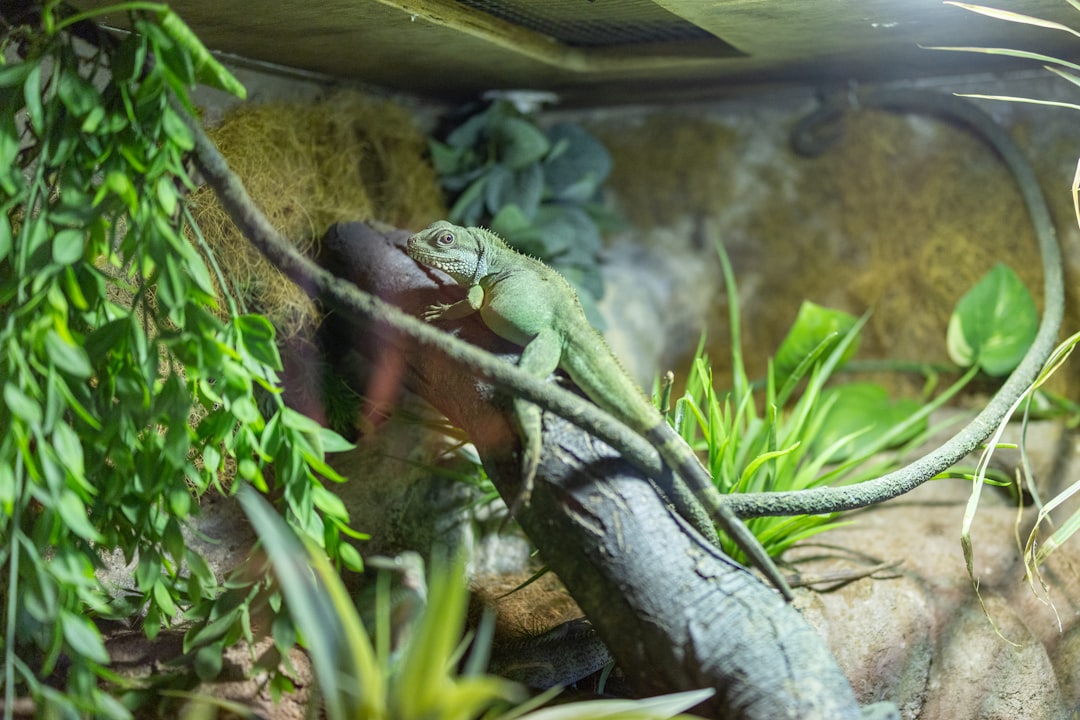
Position cork bark before planting. Larger pieces go in first since they need to sit firmly on the substrate. Create climbing routes from ground level to upper zones; crested geckos move vertically throughout the night and there should be no dead zones in the enclosure.
Leave space against the front glass so plants have room to grow forward without blocking visibility.
Step 6: Plant
Root plants directly into the substrate. Good choices for crested gecko vivariums are pothos, bromeliads, peperomia, ficus pumila, and small-leaf ficus varieties. Remove any plastic nursery media from roots and rinse before planting; commercial potting soil can introduce pests and contains fertilizers that are not safe for reptiles.
For a curated selection already sized to fit an 18x18x24 enclosure, Josh’s Frogs 18x18x25 Crested Gecko Vivarium Plant Kit takes the guesswork out of plant selection. For a full breakdown of plant species with care requirements, see our guide to the best live plants for a crested gecko vivarium.
Step 7: Set up misting
For consistent humidity, an automated misting system is the most reliable solution. The WACOOL Automatic Reptile Misting System runs on a programmable timer and can be set for one or two short cycles per day. Position nozzles to spray toward the back wall and upper cork bark rather than directly onto food dishes or the gecko’s typical resting spots.
Target humidity: 60-70% during the day, 80-100% immediately post-misting at night. Crested geckos drink water droplets off surfaces, so adequate misting is their primary hydration source.
Step 8: Add lighting
A full-spectrum LED on a 12/12 hour timer supports plant growth and provides a natural light/dark cycle. Crested geckos do not require UVB lighting the way many other reptiles do, though there is growing evidence that low-level UVB may be beneficial. For a planted vivarium, a 6500K grow-spectrum LED is sufficient for plant health.
Keep lighting 12-18 inches above the enclosure top to avoid localized overheating.
Bioactive vs. Simplified Vivarium Setups
Not every keeper wants a fully bioactive build. Here is a direct comparison to help you decide:
| Feature | Bioactive Vivarium | Paper Towel / Coco Fiber |
|---|---|---|
| Setup time | 2-4 hours | 15-30 minutes |
| Ongoing maintenance | Low (weekly misting, occasional spot clean) | High (full substrate swap monthly) |
| Humidity retention | Excellent | Moderate |
| Aesthetics | Naturalistic display | Functional only |
| Live plants | Yes | No |
| Microfauna support | Yes (springtails, isopods) | No |
| Upfront cost | Higher ($50-150) | Low ($5-15) |
| Best use case | Long-term adults, display enclosures | Quarantine, juveniles, temporary housing |
For adults you plan to keep long-term, a bioactive setup reduces ongoing labor significantly. For new arrivals or animals being monitored for health issues, a simple paper towel substrate makes waste monitoring much easier.
Common Crested Gecko Vivarium Setup Mistakes
Skipping the drainage layer. This is the most common error. Without drainage, excess water has nowhere to go and saturates the substrate from the bottom up. The result is mold and anaerobic conditions within weeks.
Using garden soil or commercial potting mix. These products often contain fertilizers, perlite, and wetting agents that are harmful to reptiles and disruptive to the microfauna that make a bioactive enclosure work.
Overplanting at setup. A freshly planted vivarium looks sparse and it is tempting to pack in too many plants. Give them 6-8 weeks to establish before judging coverage. Overcrowding at the start leads to competition and die-off rather than lush growth.
Cork backgrounds that are not fully cured. Fresh silicone off-gasses for 48-72 hours. Introducing a gecko to an enclosure with uncured silicone can cause respiratory irritation.
No separation layer between substrate and drainage. Without a barrier, substrate migrates into the drainage layer over time. Within a few months the drainage reservoir fills with fine particles and stops functioning.
Introducing the gecko immediately. Let the planted vivarium run for 2-4 weeks before the gecko goes in. This gives plants time to root, silicone to fully cure, and humidity to stabilize. If you are adding microfauna, they also need time to establish a population before a predator arrives.
Frequently Asked Questions
How long does it take to build a crested gecko vivarium?
Allow 2-4 hours for a bioactive build from scratch, not counting cork background cure time (48-72 hours) or the 2-4 week plant establishment period before introducing the gecko. If you are installing a silicone background, budget the full week before your gecko moves in.
Do I need springtails and isopods in a bioactive vivarium?
You do not need them on day one, but they are strongly recommended for long-term maintenance. Springtails eat mold spores and break down organic matter; isopods process larger waste. A bioactive vivarium without microfauna still works but requires more manual spot cleaning. Add a small starter culture of tropical springtails after plants have established for a few weeks.
How often should I mist a planted crested gecko vivarium?
Mist once or twice daily, typically in the evening and optionally early morning. The enclosure should dry down to 60-70% relative humidity during the day. Permanently wet conditions encourage mold and respiratory issues in the gecko.
Can I use fake plants instead of live plants?
Yes. Artificial plants require no maintenance and will not die off. The tradeoff is that you lose the humidity regulation and microfauna benefits that live plants provide, and the look becomes noticeably less natural over time. A common approach is a mix: live pothos and bromeliads as anchor plants with artificial plants filling structural gaps.
What temperature should a crested gecko vivarium be?
Crested geckos thrive at 72-78 degrees F (22-25 degrees C) during the day. They tolerate temperatures down to around 65 degrees F and should not exceed 80 degrees F for extended periods. If your home stays within this range year-round, you may not need supplemental heating. Our heating guide for crested gecko enclosures covers your options for when ambient temperatures fall outside range.
Building a Vivarium That Lasts
A well-built crested gecko vivarium requires less maintenance than a bare-bottom enclosure over the long run. The drainage layer, substrate, and microfauna do the heavy lifting once established. The biggest variable is the initial build: get the layers right, give the plants time to root, and the enclosure becomes largely self-sustaining.
If you are starting from scratch, order all your materials together so you can build in a single session rather than piecing it together over weeks.
Bookmark this guide for reference as you work through the build, or share it with someone who is just getting started with crested geckos.
Related reading: Crested Gecko Enrichment and Climbing Setup Ideas covers how to think about climbing structure placement and enrichment once your vivarium is complete.